
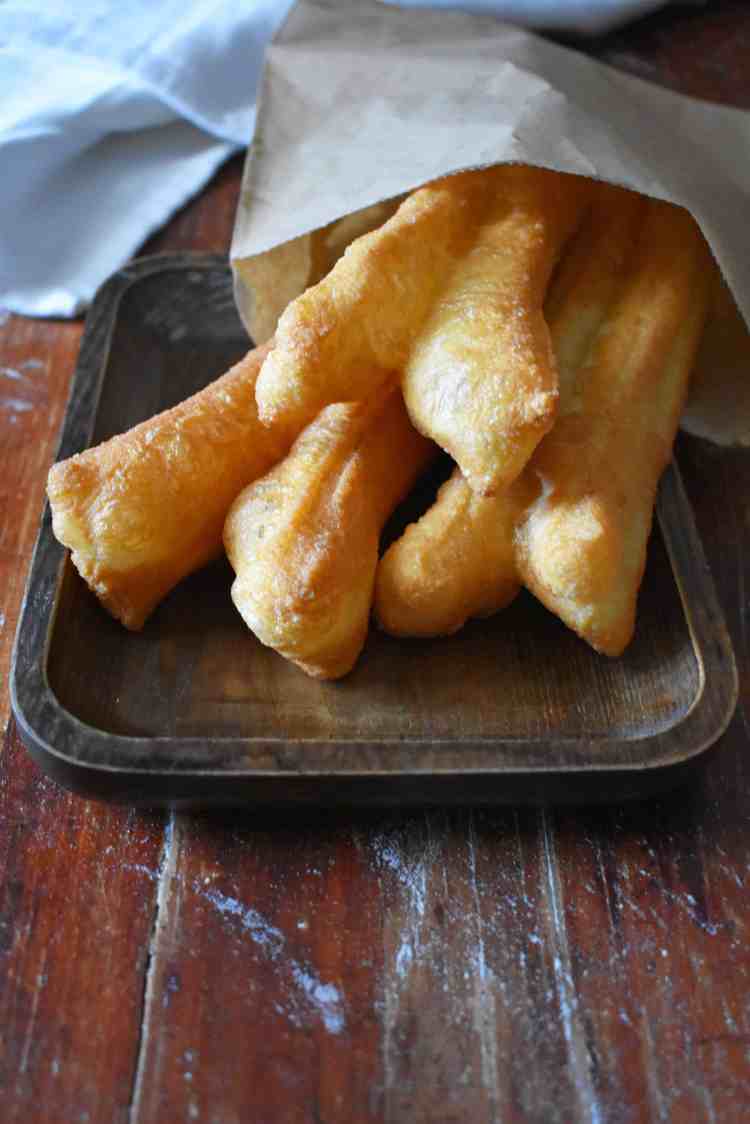
These fried bread sticks (youtiao, or dau chao quay) are a delicious and versatile treat that everyone must give a go at least once. It is similar to a doughnut but lighter, chewier and has a crispy skin when fresh. Many Asian people have them as a savoury accompaniment / snack with their congee or cup of coffee in the morning. I personally like them sweet like a churros, smothered with sugar / cinnamon or sweetened condense milk.
Recently, Steph decided for the both of us that we have to reduce our meat intake. Her new plan is to start slowly by replacing 2 to 3 meals during the week with a vegetarian option. This has obviously not gone down well with me but I have decided to be a good sport and go along with it. This is largely due to the fact the last time we argued about something petty, it was over “who washed the dishes more often?” I was the clear winner in that argument and YESSSSSS, I did do the dishes more often and YESSSSSS it felt good being right…. but it came at a cost. Therefore, as any person with a little common sense would do, I learnt from my past victories and opted to stay silent!
To re-align myself with Steph’s new weekly menu, I have decided to share with you my vegan friendly youtiao. Okaaaaaaaaaaaaaaay, I know what you’re thinking. It is suppose to be healthy as well as vegetarian… but I am taking baby steps. This dish is something I have always wanted to learn since people have always told me it looks easy but in actual fact is quite difficult. I personally love it when I hear these words because it just makes it so much more rewarding when you do perfect it!

If you search the internet on how to make youtiao, you will find that many recipes will ask you to to prepare the dough a day in advance! This is because the dough needs time to proof. This is essential for the bread sticks to become light and fluffy. However, I personally believe that it is way too long to wait, especially if you are craving them.
So for the past 3 weeks, Mum and I have been experimenting with different methods and ingredients to shorten the time needed. We began with an original recipe which mum used a lot and gradually improved on it. I believe we have succeeded in coming up with a recipe that requires far less time! Instead of letting the dough proof overnight, we have managed to get it down to an ideal time of 4 hours. I would have liked to get it down even further but the youtiao were losing a lot of volume and size.

My Tips for Success
Here are some really handy tips I picked up over the many attempts!
- My best results were from using baker’s flour (12% protein) that had only wheat flour, thiamine and folic acid as the ingredients. The brands I used were Gem of the West (Costco) and Defiance (Woolworths / Coles). Bread flour also works but does not expand as well as baker’s flour.
- The dough must be really sticky and hard to knead. I have noticed that bread flours require more liquid to acquire the same consistency as baker’s flour. If you are using bread flour, add a further 10 – 15 ml if the dough is not sticking to the bowl and your hands!
- For the best possible bread sticks, use an electronic mixer to knead the dough. This method will give you the best “puffiness.”
- Do not over dust the dough with flour. I understand that it is hard to work with a wet dough but it is necessary. I leave the dough in the bowl and knead it by using my 3 middle fingers and pushing the sides into the center as depicted in the pictures.
- The dough should be left to proof for 4 hours at a minimum.
- Do not over work the dough with the rolling pin. Compressing the dough will effect the expansion when deep frying.
- The bread stick requires very little water to combine the two halves. Do not drench the two halves of the dough in water otherwise they are more likely to become unstuck when frying.
- When stretching the dough, keep it on the tabletop. This will stop gravity from over stretching your dough.
- Work quickly! Try to cook 2 – 3 at a time and cover the rest of the dough with a kitchen towel to stop it drying out. This is because a dry dough will have a negative effect on the “puffiness” of the bread sticks.
- If you are a beginner, then my suggestion is to start by making small bread sticks. It is much easier to make 6 – 8 cm bread sticks that look beautiful then 12+ cm ones.
- And lastly, keep at it! This recipe is hard by nature so don’t be discouraged if you don’t get it right the first time. It will take you a few attempts!!!
Common Issues & Causes
I wish when my mother and I was developing this recipe, someone had wrote a troubleshoot guide! It would have made things so much easier! So, to save you guys from unnecessary frustration, I made one for you so you can self diagnose any issues and tweak.
1. The youtiao did not “puff up” at all or very little.
- The dough was not kneaded enough or well. This is usually the issue with most people.
- The dough did not proof for at least 4 hours.
- The dough was stretched too far. Try to keep it to roughly 2 – 2.5 cm at each end (4 – 5 cm in total) for best results.
- The dough was left out too dry for too long. This is especially true if the first ones were excellent and the last few did not puff up as much. So work quickly!
- The oil was too hot and the crispy skin on the bread stick formed way too quick.
2. Youtiao is bulging in the middle
- The dough was held too hard at the ends when stretching. This my have caused the ends to stick together and inhibit expansion.
3. Youtiao is only expanding on one side
- The dough is being pressed too hard with the back of the knife/bamboo skewer when sticking the two halves together.
4. Youtiao has fat ends and a skinny body
- The dough has been stretched too far in the middle and not at the ends. Keep the dough on the table for more even and controlled stretching.
So as you can see, there are a lot of hurdles to look out for! But don’t be discouraged if it does not go perfectly the first time. Just keep at it and you will be rewarded with amazing fried bread sticks.
What to Serve Youtiao With
– Scruff
PS This is a revamp of an older post. Due to feedback from some people, I have added step by step pictures and more tips to increase chances of success!

Fried Bread Sticks - Dau Chao Quay - Youtiao
Author: Scruff
Recipe: Mum & Scruff
Course: Accompaniment / snack / sweet
Ingredients
- 175 ml of warm water
- 1 tsp of instant dried yeast
- 1 tsp of sugar
- 250 gm of baker’s flour
- 1/2 tsp of salt
- 1 tbsp / 15 ml of canola oil
- Extra baker’s flour for rolling
- Canola oil for deep frying (enough for a depth of 3 cm)
Directions
1. In a measuring cup, add the warm water, dried yeast and sugar. Set aside for at least 5 mins.
2. In a mixing bowl, add the flour, salt and oil.
3. Add the yeast mixture to the mixing bowl and combine thoroughly. (Note 1)


4. Knead the dough for 15 mins. For best results, use an electronic mixer to knead the dough. (Note 2)


5. Cover the bowl with cling wrap and let it rest at room temperature for 1 hour.
6. After 1 hour, uncover the dough and knead the dough inside the bowl for 2 minutes. Do not use the electronic mixer for this step.
7. Cover with cling wrap and let it sit for a further 3 hours at room temperature.


8. After at least 3 hours, heat up the oil on medium setting. There should be at least a depth of 3 cm of oil in the pan.
9. Dust some flour on your work surface.
10. Split the dough in half with a knife and take one half out of the bowl. Cover the bowl with the remaining dough to avoid drying it out.
11. With your hands, shape the dough into a rectangle shape. With a rolling pin, flatten the dough till it is roughly 0.5 cm thick. (Note 3).
12. Use your knife to shape the dough into a rectangle of roughly 28 cm long x 12 cm in width to get the size as the ones in the pictures. For beginners please see (Note 4).
12. Loosen the dough off the work surface to make sure it is not stuck. Add a little flour underneath the shaped dough before cutting.
13. Cut segments of roughly 2.5 to 3 cm out with a knife.


14. With the back of a knife or a bamboo skewer, dip it in a glass of water and give it a little flick to remove excess water. Wet the middle of one of the segments leaving 1 cm of dried dough at each end.
15. Layer another segment on top and with the back of the knife or bamboo skewer press down where water was placed. Press in approximately 0.3 cm.
16. Dip your thumb and index finger into some flour and grab the two ends of the youtiao and stretch the dough for 4 – 5 cm in total (2 – 2.5 m at each end). Do not lift the dough off the table.


17. Check the oil is at 170 C – 175 C.
18. Slip the dough into the oil and rotate so that each side has roughly 4 -5 seconds of being completely submersed in the hot oil. Cover the rest of the uncooked youtiao with a tea towel so it doesn’t dry out. (Note 5)
19. After roughly 30 seconds, allow the youtiao to fry on one side until golden and then do the same to the side. (Note 6)
20. Take out and let it drain on a cooling rack. (Note 6)
21. Repeat and serve ASAP.


Cooking Notes
- The dough will be very sticky. It should be sticking to your fingers and the bowl while you are kneading. If not, then add more water. I suggest 10 ml at a time.
- If you are finding it very difficult to knead due to the moisture in the dough, then use a little amount of flour. Avoid adding too much and drying out the dough.
- Try to not roll the dough too much with the rolling pin. Compressing the dough too much effects the ability for the bread stick to become light and fluffy.
- My advice to beginners is to make the youtiao smaller since it is much easier to work with. Therefore, make the width of the rectangle too roughly 6 – 8 cm instead of 12 cm while keeping a 0.5 cm thickness.
- Avoid piercing the dough with your chopstick while rotating the bread stick. Piercing the dough will cause it to not expand as much.
- Only add another youtiao to the oil once the first one has stopped expanding rapidly.
- Try to leave some space between each youtiao while cooling. This is to ensure that the steam does not transfer to other youtiao and soften the crispy skin.
Just love all that incredible detail!
Thank you Michele!
Hi Scruff, just wanted to know the baker’s flour that you used is that the same as plain flour?
Hi! Bakers flour is different to plain flour since it has higher gluten and protein. Hope it turns out well for you.
another use is for rice noodle roll.
Yes! But I have yet to try it!